
Introducing custom (library) modules for NetSuite SuiteScript
Most NetSuite developers are familiar with the SuiteScript modules that NetSuite provides. These modules are a great way to get started with SuiteScript, but they have some limitations. In this article, we will explore how to use libraries compatible with the AMD engine.
Note: This article assumes you are familiar with the basics of SuiteScript and the AMD engine. If you are not, I recommend reading the SuiteScript 2.x Modules and SuiteScript 2.0 AMD articles on the NetSuite developer docs.
🔧 What Is AMD?
AMD stands for Asynchronous Module Definition. It is a module system for JavaScript that allows you to load modules asynchronously. This is useful for loading modules in the browser, but it is also useful for loading modules in NetSuite. The AMD engine is built into NetSuite, and it is used to load the modules that NetSuite provides. It is also used to load custom modules that you create.
🤔 The Problem
The problem with the NetSuite modules is that there is community maintained code that we cannot use in our projects due to the AMD limitation. For example, we cannot use the popular lodash library because how are we going to define lodash once we download it? This is a problem because lodash is a very useful library that can help us write better code. NetSuite doesn't have a dedicated package manager for SuiteScript modules, so we have to use a workaround.
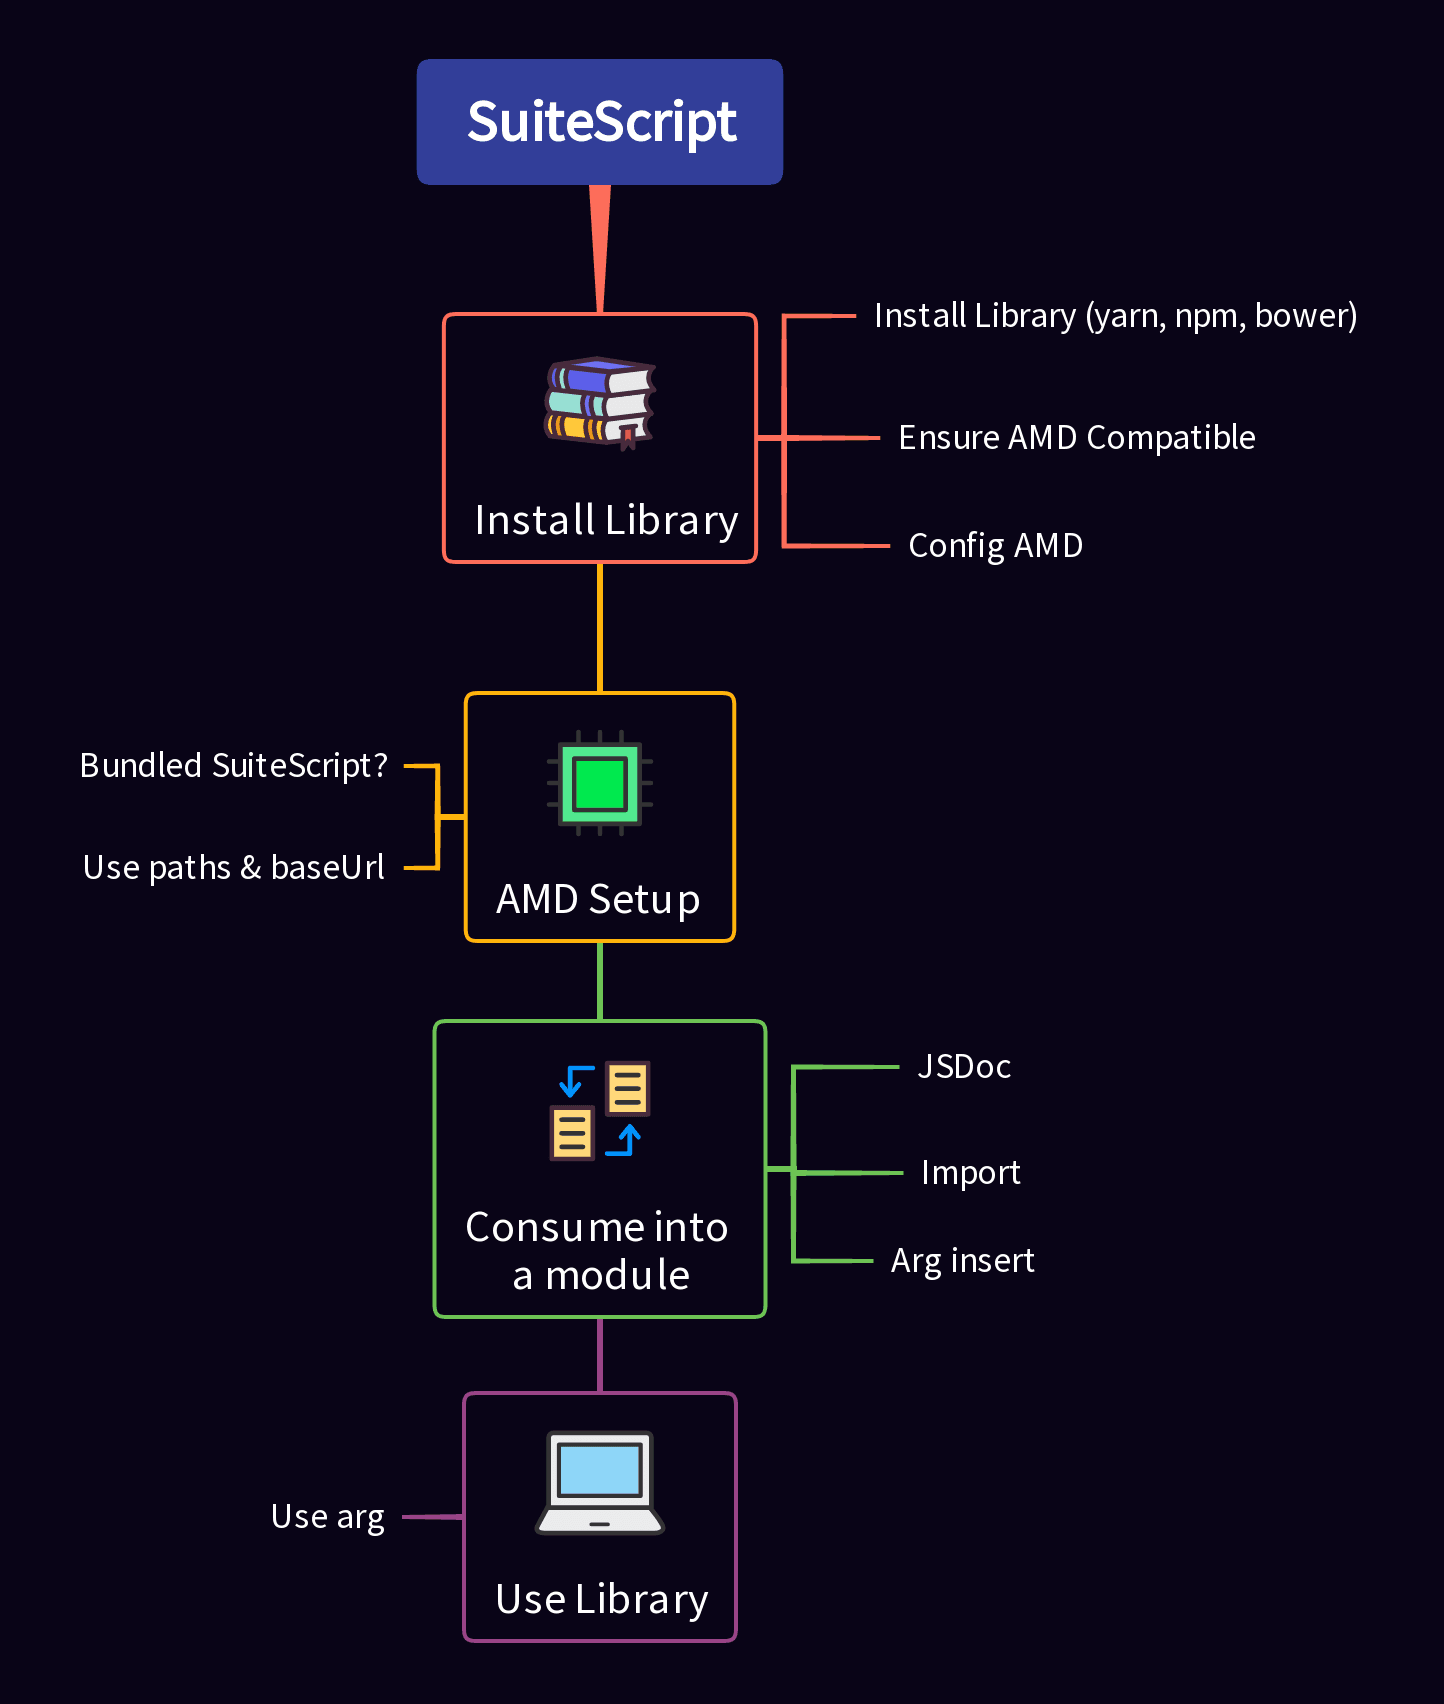
📚 The Solution
The solution is to use a library that is compatible with the AMD engine. There are many libraries that are compatible with the AMD engine, but we will use lodash for this example.
There are also ways to use libraries that are not compatible with the AMD engine, but that is outside the scope of this article.
Getting Into It
In this section, we will go over how to use lodash in our SuiteApp/Account Customization Project. We will also go over how to use lodash in our SuiteScript files.
If you are starting from scratch I would create a new Account Customization Project. If you are adding this to an existing project, you can continue and follow along but notate the difference in folder/file stucture with the SuiteApp project type.
-
Downloading the library
First, we need to download the lodash library. We can do this by running the following command in our terminal:
npm install lodashOR
You can download the lodash library from the lodash website.
Now if you are using
boweryou can use thebower install lodashcommand. What will happen is we will have to copy thelodashoutput folder frombower_componenetsinto theSuiteScripts/packagesfolder of our SuiteApp/Account Customization Project so it is accessible to the AMD engine within the File Cabinet.NOTE: To save you time and size (memory) in the file cabinet I recommend using the GZIP version of the library you choose to add to your project.
-
Adding the placement of all custom libraries
Next, we need to create a new folder in our SuiteApp/Account Customization Project. We will call this folder
packages. This folder will contain all of our custom library modules.You will create the
packagesfolder in the root of your SuiteApp/Account Customization Project. Project types differ in the location the folder should be placed. See below for the location of thepackagesfolder for each project type.- SuiteApp Project Type:
src/FileCabinet/SuiteApps/YourSuiteApp/packages - Account Customization Project Type:
src/FileCabinet/SuiteScripts/packages
- SuiteApp Project Type:
-
Adding the library to the
packagesfolderNext, we need to create a new folder in our
packagesfolder. We will call this folder@lodash. This folder will contain the lodash library.You will create the
@lodashfolder in thepackagesfolder. -
Copying the library into the
packages/@lodashfolderNow we need to copy the lodash library into our
packagesfolder. We can do this by running the following command in our terminal:cp -r node_modules/lodash packages/@lodashOR
If you downloaded the lodash library from the lodash website you can copy the lodash library into the
packagesfolder manually. -
Lodash is ready to use! 🥧
Now the library is in our
packagesfolder it can be referenced by the AMD engine - Next stop using it in our SuiteScript files!After Inital Setup: Your
packagesfolder should look like this:
Using lodash in SuiteScript (any AMD library)
In this section, we will go over how to use lodash in our SuiteScript files. We will also go over how to use lodash in our SuiteApp/Account Customization Project.
Setting up the AMD Configuration
Depending on how you have your project set up and if it is bundled or not you may have to make a logical decision on how to set up the AMD Configuration. For this example we will assume that we are using the SuiteApp project type that we are having to bundle for distribution.
-
Adding the AMD Configuration
First, we need to add the AMD Configuration JSON file to our project. We can do this by adding the following code to our
amdConfig.json:{ "baseUrl": "src/FileCabinet/SuiteApps/YourSuiteApp", "paths": { "lodash": "packages/@lodash/" } }You will add the AMD Configuration to the root of your SuiteApp/Account Customization Project. Project types differ in the location the
amdConfig.jsonshould be placed. See below for the location of theamdConfig.jsonfor each project type.- SuiteApp Project Type:
src/FileCabinet/SuiteApps/YourSuiteApp/amdConfig.json - Account Customization Project Type:
src/FileCabinet/SuiteScripts/amdConfig.json
The AMD config should be put into a root most level or root of the relative folder for example:
src/FileCabinet/SuiteApps/YourSuiteApp/scripts/user-event/amdConfig.json,src/FileCabinet/SuiteApps/YourSuiteApp/scripts/amdConfig.jsonetc.Lets put the AMD file in the root of the
scripts/user-eventfolder for this example. I will explain why this is the best route later. - SuiteApp Project Type:
-
Setting up the AMD File Contents
The contents of this file are very important. This is where we will tell the AMD engine where to find our lodash library. We can do this by adding the following code to our
amdConfig.json:{ "baseUrl": "../../packages", "paths": { "lodash": "@lodash/lodash.min.js" } }This will point to all us to import lodash in our SuiteScript files. When we normally
definea module we would do something like this:define(['N/record'], function(record) { // do something with record })For a custom module you create a SuiteScript file it looks something like this:
define(['../lib/pt_ex_cm_test.js'], function(customModule) {
  // do something with custom module
    const foo = () => {
        return 'foo'
    }

    const bar = () => {
        return 'bar'
    }

    return {
        foo,
        bar
    }
})
But now we can do something like this:
define(['lodash'], function(_) {
  // do something with lodash
})
Way better right? 🎉
-
Using lodash in our SuiteScript files
Now we can use lodash in our SuiteScript files, but there is a prerequisite in order to tell NetSuite that we are using an AMD config. The prerequisite is to add the following code to the top of our SuiteScript file:
/**
 * @NApiVersion 2.1
 * @NModuleScope SameAccount
 * @NScriptType UserEventScript
 * @NAMDConfig ./amdConfig.json <-- This is the AMD config we created
 */
You will add the AMD config JSDoc tag
NAMDConfigto the top of your SuiteScript file. This is a prerequisite for using any custom AMD options tailored to your project.Following up on the reason why we put the
amdConfig.jsonin the root of thescripts/user-eventfolder is because when NetSuite tries to load theamdConfig.jsontoo far out say if its even one directory back, and we had to change its path to../amdConfig.jsonfor instance. The file for an odd reason will not be loaded or considered by the compilation. I am not sure if this is a known bug but, I know no AMD config will work that isn't in the current script's same directory.Now we can use lodash in our SuiteScript files. We can do this by adding the following code to our SuiteScript file:
/**
 * @NApiVersion 2.1
 * @NModuleScope SameAccount
 * @NScriptType UserEventScript
 * @NAMDConfig ./amdConfig.json
 */

/**
* @param {lodash} _
*/

define(['lodash'], (_) => {
  // do something with lodash
  /**
   * Defines the function definition that is executed before record is loaded.
   * @param {Object} scriptContext
   * @param {Record} scriptContext.newRecord - New record
   * @param {string} scriptContext.type - Trigger type; use values from the context.UserEventType enum
   * @param {Form} scriptContext.form - Current form
   * @param {ServerRequest} scriptContext.request - HTTP request information sent from the browser for a client action only.
   * @since 2015.2
   */
    const beforeLoad = (scriptContext) => {
      // Test lodash
      let testArray= [1, 2, 2, 3, 3, 0, 4, 5]
       // Remove duplicates
       let uniqueArray = _.uniq(testArray)
       log.debug({title: 'uniqueArray', details: uniqueArray})
    }

    return {
        beforeLoad
    }
})
Bada Bing Bada Boom! 🚀
You can now repeat this process with any library that is compatible with the AMD engine. Just revisit these setup steps and you will be good to go!
Conclusion
In this article, we went over how to use libraries compatible with the AMD engine. We also went over how to use lodash in our SuiteScript files. I hope this article was helpful and you learned something new. If you have any questions or comments please shoot me an email! Thanks for reading! 😎